 |
|||||||||||||||||||||
|
This kit is from SierraWest Scale Models.
|
|||||||||||||||||||||
|
Construction Photographs
|
|||||||||||||||||||||
 |
|||||||||||||||||||||
|
When you first open this kit you see how huge it is! The trucks and couplers I bought separately because it came with some bonus cars.
|
|||||||||||||||||||||
 |
 |
||||||||||||||||||||
|
There is quite a bit of lumber in this kit!
|
Plenty of castings too.
|
||||||||||||||||||||
 |
|||||||||||||||||||||
 |
|||||||||||||||||||||
|
The final details including some pre-cut rail and laser cut windows.
|
|||||||||||||||||||||
|
Floor plans and other drawings
A-Z and then some! |
|||||||||||||||||||||
 |
|||||||||||||||||||||
|
The instructions suggested that the first five bags of wood should be stained by a soaking method. The rest uses a swiping method because the wood is thicker
|
|||||||||||||||||||||
 |
|||||||||||||||||||||
| Here are some of the pieces soaking in a stain made up of several colors. (Get the dish back to the kitchen and wash it really good and it won't even be missed.) | |||||||||||||||||||||
 |
|||||||||||||||||||||
|
I let the pieces soak between 6 and 24 hours then set them out to dry.
|
|||||||||||||||||||||
 |
|||||||||||||||||||||
| I started with the floor of the New Mill instead of the walls. I want to get the footprints of the buildings because I'm interested in getting the track in. It will have lots of switchbacks and steep mountains really close to the mill. | |||||||||||||||||||||
 |
|||||||||||||||||||||
|
Here is the main floor of the new mill and the sub floor too. Also, the sorting platform and the first wall of the old mill.
|
|||||||||||||||||||||
 |
|||||||||||||||||||||
| I made copies of the floor plans so I could get an idea of how the buildings are going to fit. | |||||||||||||||||||||
 |
|||||||||||||||||||||
|
The front and back walls of the old mill are being framed then the siding will go on top. I put the plans under a thin sheet of Plexiglas and build on top. When the walls are done they easily come off because the wood glue does not have a strong bond to the Plexiglas, just enough to hold it while I'm building.
|
|||||||||||||||||||||
 |
|||||||||||||||||||||
|
The old mill is completed! (Except for a little extra weathering with washes and chalks.) The roof is done later because it attaches to the new mill too.
|
|||||||||||||||||||||
 |
|||||||||||||||||||||
|
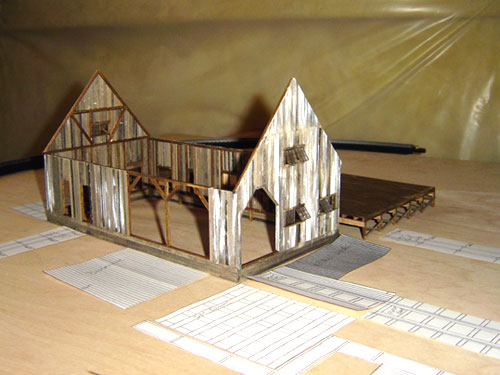
Here you can see the mill with the paper templates for the other buildings in place. This kit will take up a lot of space on the layout!
|
|||||||||||||||||||||